Last week, we did a tutorial on Method 1 of tracking up-sells: tracking One-Click Up-sells.
Today, we will introduce a more complicated, but perhaps more powerful, way of tracking up-sells that allows you to attribute up-sell conversions to different offers.
So, you can have an offer for the primary conversion, and separate offers for each up-sell and be able to see the conversions for each. If you haven’t read Method 1 yet, please review that post first.
Of course, we’ll be demonstrating this with the best tracking platform on the planet: THRIVE.
A mini fore-warning: this method may sound a little complicated at first, but as you work through it and put it into practice, it’s really not difficult to get.
Method 2: Multi-Offer Attributions
The difference between Method 1 and Method 2 is that Method 1 attributes all up-sells to a single sub ID and marks a single conversion. Method 1 simply adds on additional revenue to that conversion.
Method 2, on the other hand, will generate a unique sub ID for each up-sell offer, even if you convert it with the same sub ID. We’ll explain how to do this below. Each up-sell conversion will be marked as a separate conversion and attributed to the appropriate offer. This is considered to be higher quality data since you can run reports and analysis on up-sells separately. It allows for more flexibility.
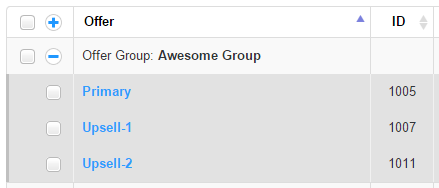
To set this up, let’s first add 3 offers to our tracking platform: 1 primary offer and 2 up-sell offers:
As you can see, THRIVE has assigned each offer an offer ID. We’ll be referencing these offer IDs in our post-back/pixel code in order to indicate which offer to post conversions to.
Next, let’s add these offers to a campaign’s rotations. Before we do that, let’s add the landing page we’re going to use to the rotation. For this example, our landing page is called: Landing1.
Then, let’s add all 3 of the offers to that landing page, so our rotations look like this:
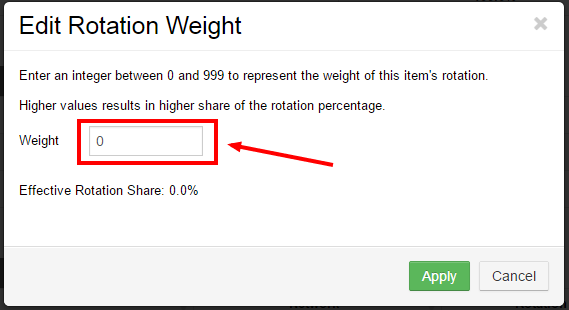
Now, we need to click on the weights of the up-sell offers and set their weight/rotation % to 0:
They should look like this (notice the 0 weights):
If you wanted to split test additional primary offers, you can add them to the landing pages and leave the weights. You can, of course add more up-sell offers to the rotation as well by adding them and editing the weights to 0.
Now, we are basically done with the setup in the tracking platform. The other components are the landing page code and pixel/post-back.
Landing Page Code & Conversion Pixel
Optional: You do not need additional landing page code for up-sell tracking (other than the standard landing page code for Landing1) unless you need to know whether your visitors lands on each up-sell page.
If you have questions on how to setup click tracking for up-sell pages, please submit a support ticket, as it’s a more advanced topic.
For this tutorial, we will assume that you do not need to track clicks on up-sell pages; just when a visitor converts on them. This means, you can simply directly link to whatever URLs the up-sell offers are on. No Thrive code is needed to link to these offers.
Let’s first go over what normally happens when you fire a standard conversion.
Let’s say a visitor clicks through your Thrive campaign URL and lands on your landing page. A sub ID is generated by Thrive to identify that visitor. Let’s say the sub ID in this case is 12345.
Let’s say the visitor clicks through your landing page and lands on the Primary offer. That person then completes a conversion on your Primary offer. To convert that visitor, this post-back would be fired:
http://domain.com/path/postback.php?tid=&amount=&subid=12345
That’s pretty standard, and you should be used to this by now. Next, let’s say the visitor also completes one of your up-sell offers. To convert that same visitor we would fire the post-back again, but a little differently:
http://domain.com/path/postback.php?tid=111&offerid=1007&amount=&subid=12345
Notice the post-back URL now contains “tid=111” and “offerid=1007”.
In this case, we are firing the same sub ID “12345” a second time (since this is the same visitor, no new sub ID would be generated for him).
When the same sub ID is fired more than once, it will only work if a unique “tid=” value exists in the post-back. This is to prevent duplicate fires of a post-back for the same visitor so you don’t get extra, unwarranted conversions.
In this case, we do want to fire an additional conversion for the same sub ID, so the “tid=” just has to be unique to that sub ID. So, you can use “tid=111” again for another sub ID. As long as “tid=111” hasn’t been fired for sub ID 12345, Thrive will mark a conversion in this case.
And where did I get “offerid=1007”? I went into the Offers page in Thrive and looked up the offer ID for the offer Upsell-1. You can also see the offer ID in the screenshot earlier in the post.
Firing a post-back in this manner will send a conversion to offer 1007 (the Upsell-1 offer) even though sub ID 12345 has already been fired for the Primary offer.
Say the visitor now goes onto offer Upsell-2 and also converts on the Upsell-2 offer. We look up the offer ID for that in Thrive, and the ID is 1011.
To convert that same visitor again on offer 1011, we’d fire the post-back again, with different values:
http://domain.com/path/postback.php?tid=222&offerid=1011&amount=&subid=12345
Notice I used “tid=222” this time since “tid=111” has been assigned to the Upsell-1 post-back. We’ve also updated “offerid=1011” to indicate a conversion for that offer instead.
Remember, the “tid=111” and “tid=222” can stay the same for different visitors (different sub IDs). It’s just that each “tid=” value can only be fired once per sub ID.
Using this method, you could convert as many up-sells as you want for different offers.
Automatically Fill in Offer IDs for Multi-Step Offers
If you wanted to take this even further, there is a way to automatically fill in the offer IDs for offers that are more than 1 step.
To utilize this advanced tactic, you must add the offers into Thrive sequentially, so they get a sequential offer ID (e.g. 1001 for the step 1 offer and then 1002 for step 2).
Then, when adding the landing page to Thrive, you can pass the offer’s ID to the landing page dynamically, like:
http://your-lander.com/?oid={offerid}
Then, the link for the step 1 offer on your landing page can be dynamically filled in, like:
http://yourdomain.com/path/out.php?sxid=<?php echo (isset($_GET['sxid'])) ? $_GET['sxid'] : 0 ?>&g=<?php echo $_GET['oid'] ?>">
So the offer ID will dynamically be filled in for the step one offer after “g=”.
Then, for the step 2 link, since it’s just one number higher than the step 1 offer ID, we can just add one to the “oid” variable.
So the link for the step 2 offer on your landing page can be dynamically filled in, like:
http://yourdomain.com/path/out.php?sxid=<?php echo (isset($_GET['sxid'])) ? $_GET['sxid'] : 0 ?>&g=<?php echo ($_GET['oid'] + 1) ?>">
This method also allows you to be able to split test multiple offers where the step 2 offer must be tied to the step 1 offer.
As you can imagine, you can essentially use the same code on all your landing pages with this method. Just remember that you need to 1) only have the step 1 offer have a positive weight in your rotations, and 2) the offer IDs of the step 1 and step 2 offers must be sequential.
And that’s it! Once you grasp this way of tracking up-sells, you’ll find that it’s incredibly flexible for tracking up-sells and really not that hard to understand.
If you are a THRIVE user, please don’t hesitate to submit a support ticket once you have a go at it, and one of our guys will check your funnel to make sure you’ve got it setup correctly.


Leave a Reply